Thursday, December 9, 2010

Week 4- Sculpting our Cubist Masks

Today we began sculpting our cubist masks out of white air dry clay from Columbus Clay Company.  I showed the students a quick presentation on Picasso, African Masks, and Cubism before we began to help them understand abstract elements in cubism a bit better.  You can view the PowerPoint Presentation here.  The students understand that each element Picasso used has purpose.  They aren't just random shapes all jumbled up.  He painted 3 dimensional objects from both sides.  Our task is to try to show all sides in our masks...


I think the kids really have a good grasp of the cubism and understand how use these elements in their masks.  Next week we'll paint our them.  I'm looking forward to seeing how they turn out!

Week 3- Sketching Cubist Masks


Today, we began a long clay sculpting project.  To begin, we sketched ideas for our cubist masks.  We talked about Picasso's cubist movement and how he was influenced by African art.  Picasso used geometric shapes to describe the human face.  He also used cubism, which is like painting a three dimensional object all at once from both sides.

Next week we'll begin sculpting our masks out of clay.  See you then!

Week 2- Exploring Imagination

I've gotten a bit behind on updating the blog.  I'll try to do a better job of keeping up!  During week two, we explored our imaginations by drawing things we saw in patterned paper.  I printed out photos of the formica pattern of my bathroom counter and also brought in paper patterned with India ink.  Finding shapes and objects in these patterns is sort of like looking up at the sky on a partly cloudy day and seeing animals in the cloud formations.  There are no wrong answers.  Only your imagination is the limit!


Saturday, November 13, 2010

Art Enrichment Begins Again!

 Art Enrichment began again this year with a new class of fourth graders eager to get down to making some art!  We began this class by outlining what was expected in Art Enrichment:

  • Mrs. Luker and I want it to be fun, but we also have to work too.  So, behavior in AE should be just like it is in regular art class during school hours.  
  • Students are allowed to bring a "working snack".  
  • Clean up at the end of class should be handled just like it is in regular art class.  You are expected to put away all supplies and leave the table and chairs just how you found them.  
  • We'll work on short projects that take one class period, other projects will span several weeks.  
  • If you miss a class, you can check this blog for details on what we covered.  


For our first class, Mrs. Luker came up with a great way for all of us to get to know each other, as I don't know all of your names.


Students drew their first names in block letters, and then decorated them with their favorite things.  Some kids obviously like patterns, while others were very specific and drew pictures of themselves playing sports, favorite foods, and other descriptive elements.

Then, each student presented their name drawing to the class and explained what they drew and why.  There were some really creative drawings and explanations!


Next Tuesday, we'll do another fun drawing project that'll require lots of imagination and creativity.  See you then!

Wednesday, June 9, 2010

Week 21- Our End of the Year Party

Today was our end of the year party.  We had a special guest, Linda Peters of MainStreet Treasures to bring some ice cream treats and thank all the kids for their hard work on the postcard contest.  One of the kids had her work chosen in the second round of postcards to be printed in the late summer/fall.  And, one of my photographs will also be printed in the second round.  All of the kids' entries are on display in the window of MainStreet Treasures.  Congrats, everyone on the job well done!

Today I brought some of my Via Colori Chalk as well as some regular sidewalk chalk.  I pulverized the Via Colori Chalk, (which is actually Alphacolor Soft Pastels) and mixed them with a small amount of water.  Then, you use a paintbrush to paint the colors on.  The result is a very bright pigment against the dark blacktop.  These pastels can also be used in stick form with no water and the result is a lot like drawing pastels on dark paper.  Here's the piece I did for Via Colori in 2008 in Goodale Park.  My dog, Maggie.  ^ ^

And here's the awesome work of the art enrichment students....


Thanks to all the parents who brought food and drinks to the party.  Thanks to the Plain City Elementary PTO for making Art Enrichment possible.
And, thanks to Mrs. Luker and Mrs. Elizondo for all their help during the year with the art enrichment program.  I hope your kids enjoyed it... I know I did!

Week 20- Finishing our Abstract Canvas Project

This week, we finished our abstract paintings.  Last week, we cut out shapes from the center of the contact paper that resulted in various windows in which we painted a complementary color of paint.  This week, we did the opposite.  We cut shapes out of contact paper, and pasted those on the canvas.  We painted over the shapes.  The shapes are covering the previous work we did.  A complementary color will surround these shapes. The acrylic paint we use is student grade, so it's a bit sheer.  We can still see some of the previous work through the complementary color resulting in a very interesting abstract painting exploring shape and color.


Monday, May 17, 2010

Week 19- Continuing our Abstract Canvas Project


This week, we added a layer of acrylic on top of the blended colors we put down on the canvas last week.  The kids cut out linear and geometric shapes in contact paper.


We talked about abstract shapes and artists and I showed some examples from Jean Miro, Paul Klee and also some Aboriginal art, since they are also studying that in their regular 4th grade art classes.


The students drew shapes on contact paper with sharpie marker and then cut those shapes out from the inside.  From there, they peeled the contact paper backing off with the help of myself or Ms. Elizondo and then carefully placed the contact paper on the canvas.


Then, the students picked a complementary color to paint in the windows they created in contact paper on to the canvas.  The result is a wonderful  blend of shape, color, and interesting composition.

Next week, well do the opposite.  We'll cut out shapes in contact paper, place those on the canvas and then paint over the negative shapes.  Instead of painting in the "windows" or in the shapes we've cut out, we'll be painting around them.  Sound confusing?  Well, you'll have to see how they all turn out as we unveil them at the Art Enrichment Class end of the year party on Ma 25th.  :)

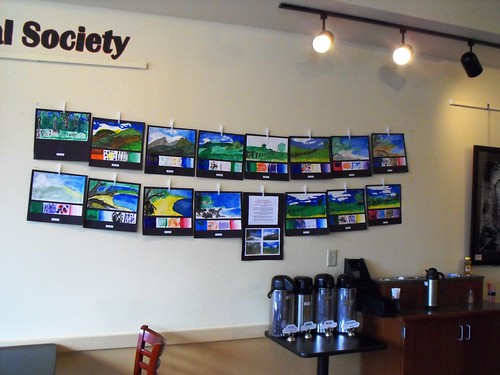
By then, we'll know the winners of the Plain City Postcard Contest.  Speaking of which, one of our students, Rachel had her painting printed in the Plain City Advocate this week.  


The winners will be announced this weekend, at Plain City Heritage Days, 1pm at the Flatiron.
According to Mainstreet Treasures, here were 59 adult entries and 11 youth entries.  Fingers crossed that some of the youth winners are students from PCES!

Tuesday, May 11, 2010

Week 18- Starting our Abstract Canvas Project

This week, we started an abstract acrylic on canvas project.  The students chose two colors to blend as their background...


We talked about blending the two colors, so that you could see both the orginal colors, plus the blended color.  For example, students who chose red and blue would have red, blue, and some shades of purple on their canvas.  


We painted our entire canvas area... even the sides of the canvas, creating a natural frame.  There were some really beautiful color combinations.  The kids paired up in groups if they were using the same two colors.  But, no two canvases look alike!


This week, we'll work on our next layer utilizing Contact Paper cut in to abstract shapes.  See you then!

Monday, May 3, 2010

Week 17- Finishing our Watercolor Postcard Entries

Today we finished our watercolor postcard painting entries.


Some of the kids got finished early and did some free painting.  Look at these neat bookmarks the kids made with scrap pieces of watercolor paper...


I was really pleased with the kids' effort on these postcard paintings.  Some of them look like adults could have painted them.  Great use of color, layering and composition!  I hope one or more of the students work gets chosen to be printed as a postcard by the MainStreet Treasures shop.   The contest winners will be announced on May 22nd, during Plain City Heritage Days.

This coming Tuesday, we'll start our acrylic on canvas/aboriginal art inspired paintings.  See you then!

Wednesday, April 21, 2010

Week 16- Painting our Postcard Contest Entries

This week, we continued on with our postcard contest entries and started painting.  I briefly went over the watercolor techniques and tips on painting outdoors, since some of the kids decided to paint the school.


Some kids painted inside...


I know some of the students weren't entirely happy with the results of their paintings.  They are free to do another painting at home if they'd like to submit it to the contest in addition to the one we submit from the class.  I sent out the guidelines and entry forms.  If you need another copy, please e-mail me at hframbes at gmail dot com and I'll be happy to send you another form.  

I'm in the process of planning a party for the kids, parents and teachers on the last day of class, May 25th.  Stay tuned for information on that.  See you next week!

Monday, April 19, 2010

Week 15- Starting our Watercolor Postcard Contest Entries

This week, we started our watercolor postcard contest entries by working on our drawings.  The theme or the contest, which is open to kids as well as adults, is "What does Plain City mean to me?".  The kids can paint any subject they wanted to explain this theme.  About 1/2 the class decided to paint the school, so I took them outside....


Even though many of the kids decided to draw the school, their viewpoints will all be different.  Some kids decided to focus on one part of the building, while another chose to draw the flag that sits in front of the school.  


Special thanks to Mrs. Luker's long term substitute Sara Elizondo for helping helping me with the art enrichment program for the rest of the year.  She stayed inside and helped the kids who wanted to draw from photos of Plain City that I brought in.  

Be sure to check out the art enrichment students' paper mâché sculptures in the cases at the front of the school.  They really turned out wonderful and all of you should be proud of a great job done.  Mrs. Luker told me that she got lots of compliments on them while they were still in the art room.  

Next week, we'll start painting our postcard entries.  We've got 2 Tuesdays before the due date, so come to class ready to paint.  See you then!

Thursday, March 25, 2010

Weeks 13 & 14- Painting our Animal Sculptures

Sorry I haven't put up a blog post lately.  During the past 2 classes, we painted our animal sculptures.  


Mrs. Luker told me that she's gotten lots of compliments on the kids' sculptures.  I'm not surprised... they look amazing!  Look for these sculptures after spring break in the glass display cases at the front of the school.  


Speaking of Mrs. Luker, this is the last class that these fourth graders will have with her, as she will be off for maternity leave after spring break.  Mrs. Luker... thank you so much for your time and talent in art enrichment class!  We wish you all the best for the upcoming birth of your child!  :)

After spring break, we will start a couple of painting projects.  One involves painting with acrylics on canvas and layering shapes with contact paper.  The other, is a postcard contest sponsored by the Plain City Business Association.  Details to follow soon!

Thursday, March 4, 2010

Week 13- Painting our Animal Sculptures


This week we began painting our animal sculptures with acrylic paint.  Acrylic paint is opaque, which really covers the newsprint well.

Some of the kids decided not to paint their animal exactly how it looks in nature. I thought this was a fun idea. One student thought it would be fun to put a tie dye pattern on her penguin. Another student decided that spots would be neat on a dog. I like the idea of playing with these sculptures and making them even more interesting to look at. We've been stuck in our houses all winter with gray skies outside. Why not have some fun with color?


For this blog update, I decided to directly upload the photos to the blog instead of using flickr as my picture hosting site.  I've heard that teachers at the school haven't been able to view the pictures on the blog, because flickr is blocked.  Hopefully, you'll all be able to see the photos now.  :)

We'll continue painting our sculptures next week and finish up this project. See you next week!

Wednesday, February 24, 2010

Week 12- Continuing the Paper Mâché Process

The week, we continued to lay down wet newspaper strips on our sculptures. It was kind of funny to see some of the boys grossed out by the flour/water mixture. On the flipside, most of the girls seemed to be fine with it! Anyway, the kids had a great time finishing up this process of their sculptures and once again, thanks to the moms who came in to help us!

Here's some examples of their progress:


And here they are all together.....


Next week, we'll begin painting our sculptures and also help Mrs. Luker and Mrs. Klenowski paint the sets for the 3rd/4th grade play. See you then!

Wednesday, February 17, 2010

Art Enrichment Students' Work On Display at the Pioneer Coffee Company


Hi everyone! We've missed two classes because of all this bad weather and snow. I hope everyone's been staying warm and taking some time to paint or draw on their own to pass the time.

I wanted to let you all know, that the students' watercolor landscapes are on display at the Pioneer Coffee Company on Main Street in Plain City! They've been given a very prominent spot right in the front of the coffee shop, right next to other local professional artist's work. Please go in and take a look at them... they look fantastic all together.

And, please support the Pioneer Coffee Shop and thank them for agreeing to show the kids' work. :)


UPDATE:

I just got a really nice e-mail from Jeremy at the coffee shop...

Hi Hilary,

Its Jeremy from Pioneer Coffee. The art work is all hung on the wall and looks GREAT! I hope all of you can make it out sometime soon and see how much it livens our place up. Just wanted to say thanks again for the participation and contribution. One of our main visions is reaching out and being very much involved in this community, and this was a great step in that direction. Hope to see you soon!!

Jeremy

Wednesday, February 3, 2010

Week 11- Beginning the Paper Mâché Process

Today we started the messy, sticky, gooey process of laying the wet newspaper on our armatures. I mixed up several bins of flour and water and the kids tore the paper into strips. I demonstrated how to lay the paper on in layers, overlapping each piece with the next strip. You start with the largest part of your animal and work your way out to the legs or limbs. Here's some photos of the kids work:


Here they all are drying on the ramp in the art room...


Special thanks to April Kieffer for coming in to help this week. We really appreciated it!

If any parents would like to come next week to help, we'd love to have the extra hands. :)

And, please send in newspaper with your child if you can. See you next week!